‘File’ ‘Save/Mail Archive’
This command is used to set up and create a project archive file. All files which are referenced by and used with a CoDeSys project can be packed in a compressed zip file. The zip file can be stored or directly can be sent in an email. This is useful if you want to give forward a set of all project relevant files.
Note
The archive function is not practical for restoring a project environment. It is designated for an easy packing of all files belonging to a project. When unpacking an archive the paths of the particular files must be adapted to the actual CoDeSys environment!
When the command is executed, the dialog box ‘Save Archive’ opens:
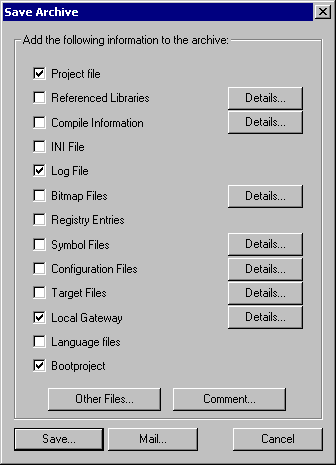
Here you can define which file categories should be added to the archive zip file: Select or deselect a category by activating/deactivating the corresponding checkbox. Do this by a single mouseclick in the checkbox or by a doubleclick on the category name. If a category is marked with  , all files of this category will be added to the zip file, if it is marked with
  , none of the files will be added. To select single files of a category press the corresponding button Details. The dialog ‘Details’ will open with a list of available files:
The dialog shows a list of all files which are available for the category: Automatically alle files are selected, an exception is category ‘Target Files’ where only the files are selected which are relevant for the currently set target system. For modifying the selection activate resp. deactivate the desired files. With the button ‘Select All’ all files of the list are selected, with ‘Select None’ none of them. A single file can be selected/deselected by a mouseclick in the checkbox, also by a doubleclick on the list entry or by pressing the spacebar when the list entry is marked.
Close the Details dialog with ‘Save’ to store the new settings.
In the main dialog the checkbox of categories, for which not all files are selected, will appear with a grey background color  .
.
The following file categories are available, the right column of the table shows which files can be added to the zip file:
| Category | Files |
| Project File | projectname.pro (the CoDeSys project file) |
| Referenced Libraries | *.lib, *.obj, *.hex (libraries and if available the corresponding object and hex-files) |
| Compile Information | *.ci (compile information) *.ri (download/reference information) <temp>.* (temporary compile and download files) also for simulation |
| INI File | Codesys.ini |
| Log File | *.log (project log file) |
| Bitmap Files | *.bmp (bitmaps for project POUs and visualizations) |
| Registry Entries | Registry.reg (Entries for Automation Alliance, Gateway and SPS; the following subtrees will be packed: HKEY_LOCAL_MACHINE\SOFTWARE\3S-Smart Software Solutions HKEY_LOCAL_MACHINE\SOFTWARE\AutomationAlliance” |
| Symbol Files | *.sdb, *.sym (symbolic information) |
| Configuration files | files used for PLC configuration (configuration files, device files, icons etc.): e.g. *.cfg, *.con, *.eds, *.dib, *.ico …. |
| Target Files | *.trg (target files in binary format for all installed targets) *.txt (target files for the installed targets in text format, if available) |
| Local Gateway | Gateway.exe, GatewayDDE.exe, GClient.dll, GDrvBase.dll, GDrvStd.dll, GHandle.dll, GSymbol.dll, GUtil.dll, further DLLs in the gateway directory if available |
| Language Files | language files used for visualizations (*.vis, *.xml) |
| Bootproject | Bootproject files <project name>.prg, <project name>.chk resp. the target specific bootproject files. |
To add any other files to the zip, press the button ‘Other Files’. The dialog ‘Other files’ will open where you can set up a list of desired files.
Press the button Add to open the standard dialog for opening a file, where you can browse for a file. Choose one and confirm with Open. The file will be added to the list in the ‘Other files’ dialog. Repeat this for each file you want to add. To delete entries from the list, press the button Remove. When the list of selected files is ok, close the dialog with OK.
To add a Readme file to the archive zip, press the button ‘Comment’. A text editor will open, where you can enter any text. If you close the dialog with OK, during creation of the zip file a readme.txt file will be added. Additionally to the entered comments it will contain information about the build date and version of CoDeSys.
If all desired selections have been made, in the main dialog press:
- Save… to create and save the archive zip file: The standard dialog for saving a file will open and you can enter the path, where the zip should be stored. The zip file per default is named <projectname>.zip. Confirm with Save to start building it. During creation the current progress status is displayed and the subsequent steps are listed in the message window. There also a message will be displayed if any file could not not been found.
- Mail… to create a temporary archive zip and to automatically generate an empty email which contains the zip as an attachment. This feature only works if the MAPI (Messaging Application Programming Interface) has been installed correctly on the system, otherwise an error message is generated. During setup of the email the progressing status is displayed and the steps of the action are listed in the message window. The temporary zip file will be removed automatically after the action has been finished.
- Cancel to cancel the action; no zip file will be generated.
Note
After unpacking the archive zip on a different system it might be necessary to adapt the file paths!